2.3. Installing SSH
2.3.1. Downloading
To install SSH we're going to use the SFSetup tool that is being provided by SourceForge. You can find the link to it on the SourceForge Setup page. At the time of writing this, version 1.2 was the most current, so I used that one.
2.3.2. Setup
For the setup tool to work, you'll need to know you SourceForge username and the projectname.
Download setup.zip
Unpack it
Read the README.TXT
Run the program
Click on Proceed> at the first screen
The second screen displays what setup stages you can have the tool perform for you:
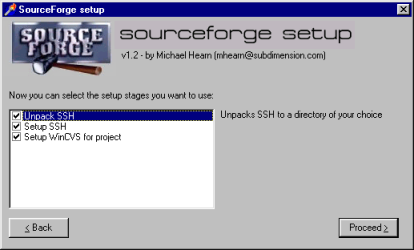
Leave it that way and click on Proceed >
Select a directory to install SSH in. The suggested directory c:\ssh will do, so just click on Proceed>
The next screen asks (again) for the SSH installation directory, your home directory and you username:
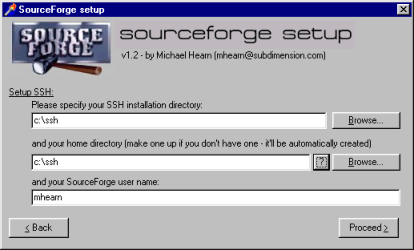
If you took my advise and didn't change the installation directory, you can leave both the SSH installation directory and the home directory unchanged here also. If you did change it, you'll have to change both entries here also.
Change the default SourceForge user name to your own SourceForge username.
Click on Proceed> again
The setuptool now asks for the name of the project you want the set up, you username (again) and the root-directory you created to store the files in.
Enter the name of the project you want to set up
Leave you username like it is (assuming it still is the same)
Enter the root-directory you created before
Click on Proceed>
SourceForge Setup is now ready for installation.
Click on the Start button
After Setup has been completed you need to restart your computer.
Restart your computer
BTW, if you like the setup tool, Michael Hearn, who created it would appreciate your feedback on it!
2.3.3. Generate a SSH public key
Generating a SSH keyset allows you to use WinCVS without having to provide your password for each single action. You have to goto the DOS-prompt to do that.
In Windows select: Start > Run > Command to get a DOS-prompt
Goto the directory where you installed SSH
Create a subfolder named .ssh (starting with a dot !)
Note: You can't create the .ssh folder from within Windows, you need to do it from the command promgt. The keyset gets stored in this folder.
Run the ssh-keygen command: ssh-keygen -C sf2k.sourceforge.net
When asked for the file to save the key to, just press RETURN
When asked for the passphrase, and the confirmation of that passphrase do the same, so just press RETURN twice
The output for this process should look something like this:
		C:\ssh>md .ssh
		C:\ssh>ssh-keygen -C sf2k.sourceforge.net
		Initializing random number generator...
		Generating p: ...............................++ (distance 698)
		Generating q: ............++ (distance 188)
		Computing the keys...
		Testing the keys...
		Key generation	complete.
		Enter file in which to save the key ($HOME/.ssh/identity):
		Enter passphrase (empty for no passphrase):
		Enter same passphrase again:
		Your identification has been saved in c:\SSH/.ssh/identity.
		Your public key is: 102433677831289340244745550388170335659674969791021549506223689907201003558365
		68521100878488679990267204264274988350400643854310295129892779398155471827652141
		62591487460218665918868192222993293889477338393645885656196801995332971995232956
		7286827545497770470796469575894213883916103515692590367902068410229388065241
		sf2 k.sourceforge.net
		Your public key has been saved in c:\SSH/.ssh/identity.pub
		C:\ssh>
Your C:\ssh\.ssh directory should now hold at least the files identity, identity.pub and random_seed
2.3.4. Configure Sourceforge.net
Next thing to do is to tell the server at Sourceforge.net what you public key is.
Logon to Sourceforge.net
Goto your Account maintenance page
Scroll down to the "Shell account information" part of the page
Select to edit you SSH key
You now get a page with a textbox. Here you can upload you public key.
Open you identity.pub file in a texteditor
Select the entire public key
Copy and paste the key into the textbox on SourceForge
Click on update (two times)
It takes about 6 hours before the key is operational. So until then, it won't work yet. Leaves us some time to configure WinCVS for SSH.
2.3.5. Configure WinCVS/SSH
WinCVS needs to know where to find the public key you just generated and what it needs to do to logon. If SFSetup has done its work, most should allready have been added, but we'll check it to be sure.
Start WinCVS
Select Admin > Preferences
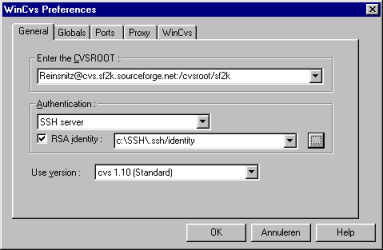
The tab General should be selected by default
The CVSROOT should allready have been added by the SFSetup tool.
The format for the cvsroot is: <Username>@cvs.<Projectname>.Sourceforge.net:/cvsroot/<Projectname>
Authentication should be set to SSH server
The checkbox in front of RSA identity should be checked and the keyfile textbox should point to you identity file
Use version should point to cvs 1.10(Standard)
Click the OK button to apply the setting
2.3.6. Want to know more about SSH?
I'm not going into the details about SSH in this HOWTO, but if you want to know more, take a look at this documentation page at SourceForge.